


Cloud Files
From here you can manage (upload, share, delete) files. After selecting Instrument Files, loaded into a screen, in the section under the familiar panel for selectingthe Tool (1.a), search box (1.b) and Info and User Settings (1.c), you will see files which until now you have uploaded in the service.

By default you load all files (All files - 2.a), available in the service. But you can choose to display only files shared with you (Shared with you - 2.b), files you've shared with others (Shared with others - 2.c), such shared via the link (Shared by link - 2.d) or files that you are deleted fro you(deleted files - 2.e).
Any group you choose in the left side, in the right side will appear relevant folders / files contained in her group. You will see the name (3.a), size (3.b) and when it was last modified (3.c). You can arrange them in any of these criteria by clicking on its name (the default layout is name). Repeated clicking changing upstream and downstream arrangement. If you want to select all, click on the right (3.d).
If you click on a folder, it will open and display the relevant folders / files contained in it. If it's a file, the file will be opened for viewing / editing (after their kind).

To add a new item, click on the New (4.b) and appears button choose what you want to add: text file (4.b.1), folder (4.b.2) or by email ( 4.b.3). To upload a file, click on the button (4.c), which is the right of the New. In the opened window, select the file (max. 800 MB) from your computer and press OK The file will be uploaded to the folder where you are now.
At the bottom you will see information about how files and folders (5.a) contained in the Service, and their total size in MB (5.b).

You can change the name of a file / folder, and to do so simply click on the button Pencil (6.a), next to the name of the desired file. The name of the file / folder will appear in the box, what can edit it. As you exit the field, the change will be saved automatically.

If you want to download the uploaded file, click on the button Download (6.b), appearing provided the desired file. This will open a window in which to specify where to save the downloaded file. Click OK and you are done. You can download more files at once or all files / folders by selecting them individually each or all by clicking on the button (3.d) and then Download (6.f).

To delete a file / folder, select it by clicking in the lower right corner of the icon (). It will appear next. Select appears, click Delete (6.g), click on it and the file / folder will be moved to the Deleted group. To delete all the click of a button (3.d), to mark them and then Delete (6.g).
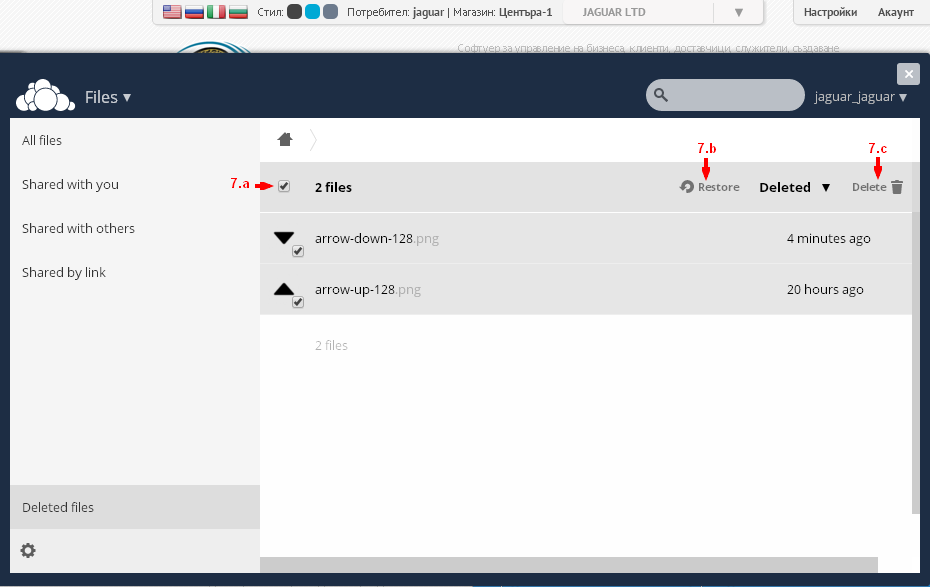
If you wish, you can restore the deleted file / folder back. To do this, select theDeleted files group(Deleted files - 7.) and file / folder you want to restore and click on the button Restore (7.b).

To restore all deleted files / folders located here, mark them from the button (7.a) and then click Restore (7.b). If you want to delete them without being able to recover, clickDelete (7.c).
If you want to share the file, click onShare (6.d). In the opened box, select User or Group (8.a1), with whom you want to share files. Making your selection, the field will allow for additional options for sharing, such as Notify via e-mail (8.b), permit sharing (8.c), permission to edit (8.d). You can select Sharing a connection (Share link - 8.e). If you want to remove Sharing, click the Unshare (8.f).
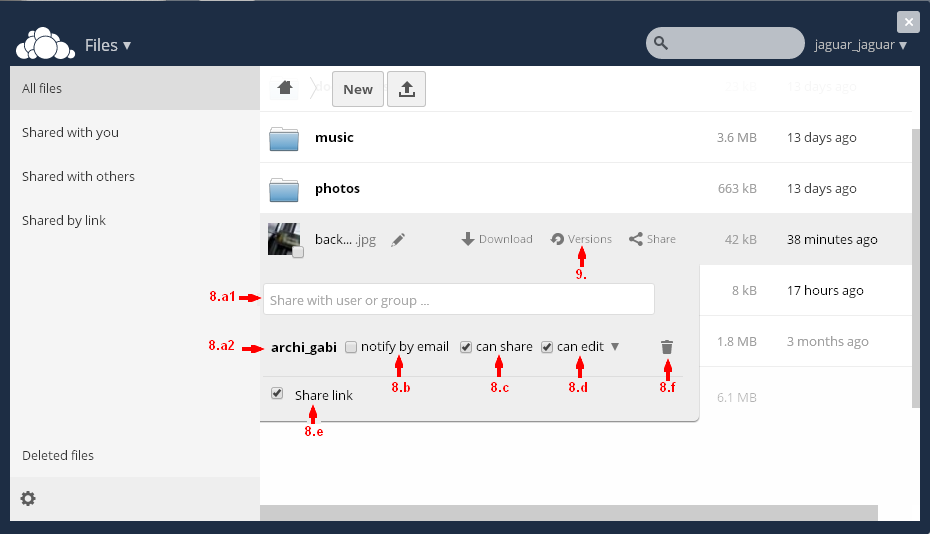
Shared files / folders are displayed marked Shared (6.e) next to their name in the list.
If you have multiple versions of a file, you can see them by clicking on the Versions (9).