


Cloud Calendar
Here you can manage (add, edit, delete) Events / Tasks in your calendar so you never miss a task.
The calendar is loaded by default when clicking on a button Cloud & Calendar, located below-left aside in theMy-doxsystem or by his election by right, top-left.
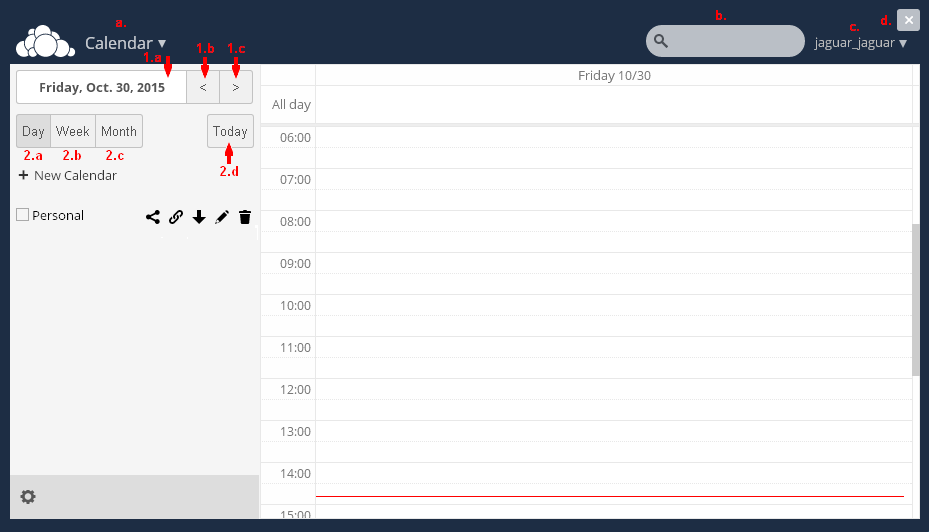
Like any otherService tool, in the upper part contains a standard button to select an instrument (a), Search Box (b) and Info and Settings User (c) and Close (d).
Under the toolbar with the instruments, you will see a box with the current date, week or month (1.a) (as selected by the lower buttons intervals: Day (2.a), Week (2.b), Month (2.c)) with 2 arrows aside (left and right). The left arrow (1.b) returns 1 period back right (1.c) - 1 period ahead (day, week, month - again according to the selected button: Day, Week, Month). If you click in the box, you open the calendar for the current month, from which you can also choose the direct day to add the event.
Presently, aside'll see button Today (2.d) - it wherever you are right now, you can return to the interval including the current day.
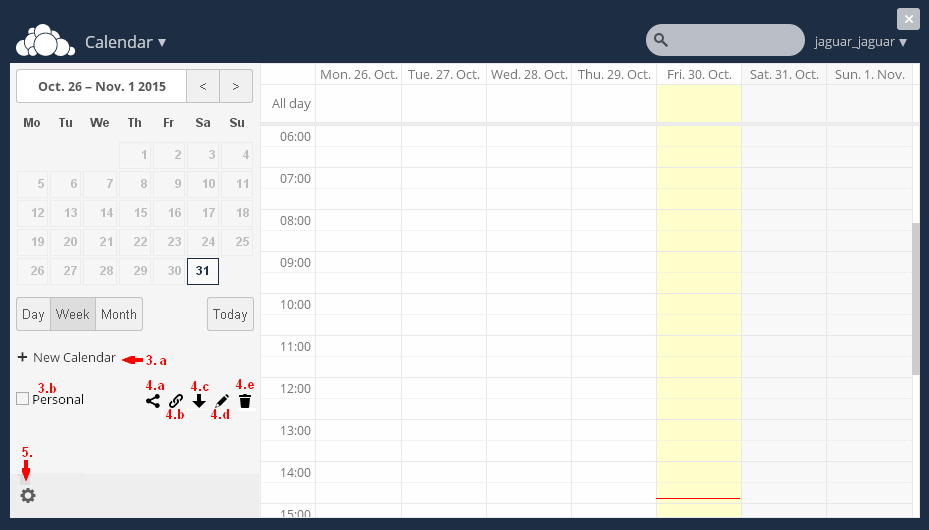
Below them is button+ New Calendar (3.a), from which you can add a new calendar.
A below is the selection box Personal (3.b) and several buttons,accordingly:
Share Calendar (4.a) - from here you can share an event on social networks.
CalDav Link (4.b) - from here you can take your CalDav link ....
Download (4.c) - from here you can download events.
Edit (4.d) - From here you can edit the selected event that you added earlier.
Delete (4.e) - From here you can delete an event, added earlier (if already done or undone, or just do not want to be in your calendar.
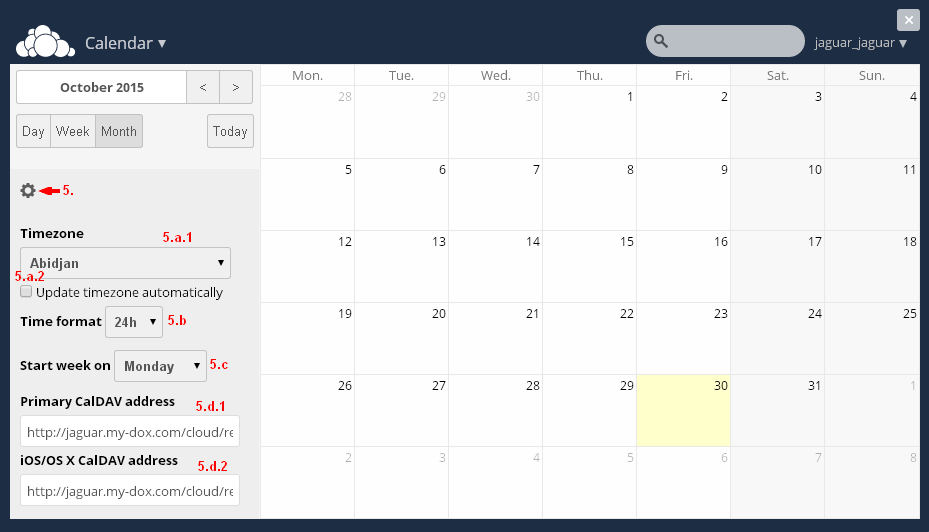
From the wheel button of the mouse(5) in the bottom left, you can edit some settings related just to this tool:
Timezone (5.a.1) - you select (or change) time zone in which you work with the Service. Click on the drop-down menu and choose from the list click on the corresponding city (sorted by Continents). If you check pollentia Update timezone automatically (5.a.2), the time will be synchronized automatically.
Time Format (5.b) - From here you can select whether hours are 24 am. Format or 12 (morning / afternoon).
Start Week on (5.c) - from here choose from which day you begin the week: Monday, Saturday or Sunday.
Primary CalDAV address (5.d.1) -Here you will see your main CalDAV address.
iOS / OS X CalDav address (5.d.2) - Here you will see CalDav address that you can use with iOS / OS X devices.
In the big right part is true Calendar, which will create Events / Tasks / ... According to the selected key time interval Day, Week, Month, will show you different.
If you selected Day, you'll see the day you have selected (in the form Day Date (MM / DD)). Below him, in the first row will have All day. Use this line if your task refers to the day i.e.. no specific time /.
On other lines, you can add events / tasks, each order is for a half hour interval. You can scroll with the mouse, if you do not see click on the corresponding time of day. By clicking click on the corresponding line window, you will open Create New Event, which will be able to add relevant tasks.
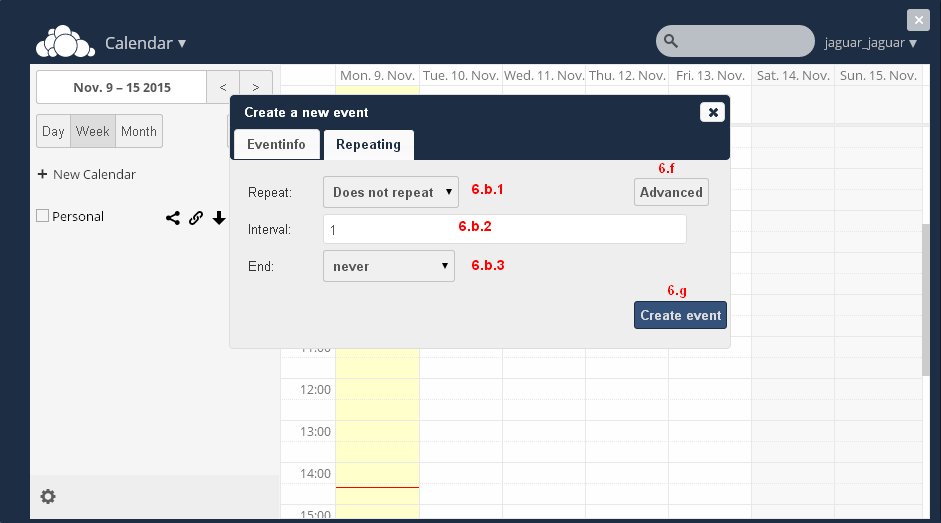
Add information about the event / task (6.a), like Title (6.c), part by (6.d.1) - to (6.d.2). If you are going for the day, in general, check the box All day Event (6.d.3). If you want, click on Advanced (6.e) to add advanced options such as Location (6.e.1), Categories (6.e.2), Description (6.e.3). The categories can edit button Edit (6.e.4).
You can set Repeatability of the event / task. Click Repeating (6.b) and fill the required field.Select from the list Repeat (6.b.1), as well as Advanced (6.f) - Interval (6.b.2), End (6.b.3). To finish, click on the Create Event (6.g)
If an Event / Task will be more than half an hour, you can create a longer event, using the mouse and click and drag to as interval want / event 1 hour, click the box next to click on the corresponding time / ex10: 00 / and drag down the mouse in the adjacent field. (Will turn blue and will show timings). You will see that in the popup window to create a new event, the time interval will be 1 hour.
The time interval can be changed by selecting from the relevant fields per hour (beginning and end) of the opened window Create New Event (after you have clicked on a particular field). The second way you can change the time interval over 5 min.
If you selected Week, the right screen will be similar to the previous one, only instead of having column for one day, you will have the whole week. (Starting from the day you selected in the aforementioned Settings). Similarly, you can create a New Event / Task.